SEO is truly a nightmare for all the bloggers and digital marketers to bring their blog/website under the notice of people. This task is somewhat simplified in WordPress. All thanks to the Yoast SEO Plugin. This plugin is the most popular SEO plugin for WordPress. Yoast SEO plugin is I think, the only WordPress SEO plugin in the market which does a major part of the SEO for your website and that too for free. Although, it also has a paid feature but most of its features are available for zero cost.
So before starting the tutorial to configure the plugin, let us know some terms related to today’s topic.
What does SEO mean?
SEO stands for Search Engine Optimization. Optimization means, to enhance the features more and more. Search Engine Optimization consists of the techniques you can use to bring your website on the first page of the search engine. If you are a newbie then you will sure be confused as to how to enhance and optimize your website so that it comes on the first page of the search engine. There are some of the things that can be taken care of and this can be managed by Yoast SEO plugin. This plugin comes packed with a lot of features. Some of them are:
- It manages most of your Social Accounts like Facebook, Twitter, LinkedIn, Google, Tumblr etc.
- It helps in search engine verification which is an important part of SEO.
- It manages your Titles and Metadata
- It manages page URL’s
- Sitemap
- Taxonomies
- It handles the Archives
The above is an important SEO checklist that will help your website outshine others on the search engine. You can definitely sleep tension free as Yoast SEO WordPress plugin will handle it with ease.
- See how to effectively use titles in your blog
- Change Fonts and Font Size
- Top WordPress Plugins that will save your day today.
So let us look how to configure Yoast SEO plugin that will yield maximum benefit to us at no cost.
Yoast SEO Plugin Configuration:
Step 1 – Install Yoast SEO:
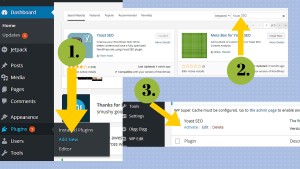
Go to Plugins -> Add New -> Type “Yoast SEO” -> install plugin -> Activate
Yoast, as I told you is a free WordPress plugin. After installing the plugin you will get the “SEO” tab in the left sidebar of your dashboard. This means that Yoast is successfully downloaded and activated. So now we will move to the configuration part. Let’s see how we can use the Yoast SEO plugin settings to enhance the visibility of our website on the search engines and social networking sites.
Step 2 – Yoast General Settings:

After activating the Yoast SEO plugin, click on the SEO tab in the left sidebar of your dashboard. You will see multiple dropdown settings. We’ll start from the first Option i.e. General settings.
General setting is the basic setup for your website. You can use it for following:
- Setting up the name of your blog which will appear in the search engine.
- Setting up your personal information. This will link the website with your name and will be a useful SEO practice for the search engines.
- You can verify your blog with different webmaster tools like Google, Bing, Yandex etc. This is one of the most important features of following the best SEO practice.
- This will notify the search engines about your website and further help you to rank and get your posts indexed on the search engines.
Now let us move to the next option.
Step 3 – Titles and Metas:

Titles and Meta is an important Yoast feature to display the content on search engines according to your wish.
Some of its important features are:
- Choosing the Title separator. You can choose from various title separators. A title separator is a symbol which separates the title depiction of your website. For eg. www.abc.com/what-is-SEO. In this, -(hyphen) is the title separator
- You can choose the custom site name. This is the way you want to show your websites name on the search engines.
- Defining Meta description is a part of SEO best practice. You can give a quick description of your blog, what your website is all about in the meta description.
- Taxonomies is also an important part that you should keep in your SEO checklist. As you know that the categories and tags are an important part of your website. This will help the viewers on your website to navigate easily on your blog. But, it has no importance when the search bots crawl your website to index it. Thus, you should always add a noindex attribute to both of these.
- Apart from these, you can also handle the archive section of your blog.
So this was all about bringing your website on the search engine. Now, let us go through some of the techniques to handle the social part of our website.
Step 4 – Handling Social Media:
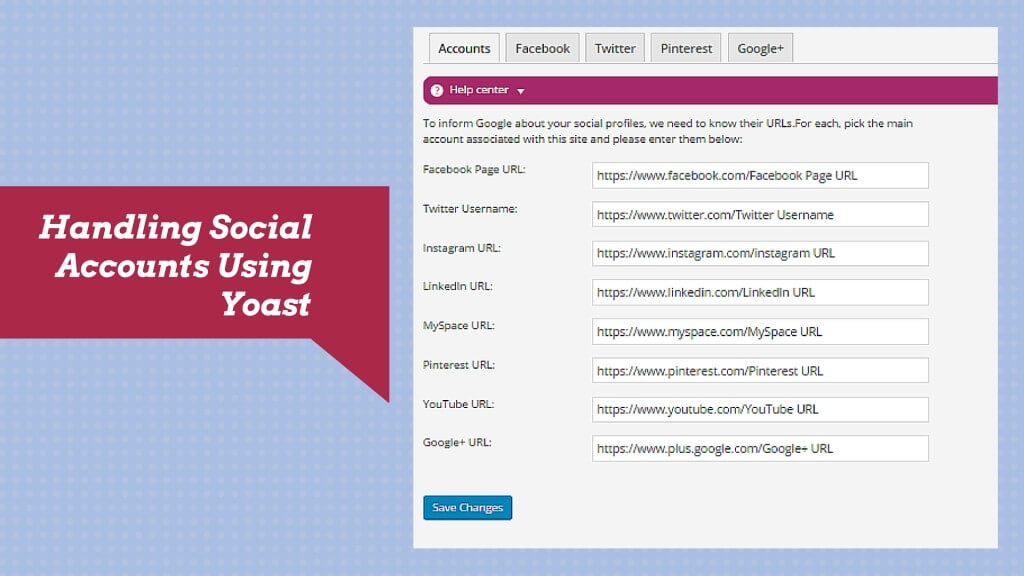
Handling social media channels is easy with the Yoast SEO plugin. You can update your various social media handles in this section. This will tell the search engine that you have the following accounts for your websites. This will further help you to drive traffic from the social networking sites.
Now let us see one of the most important features of this plugin.
Step 5 – Sitemaps:
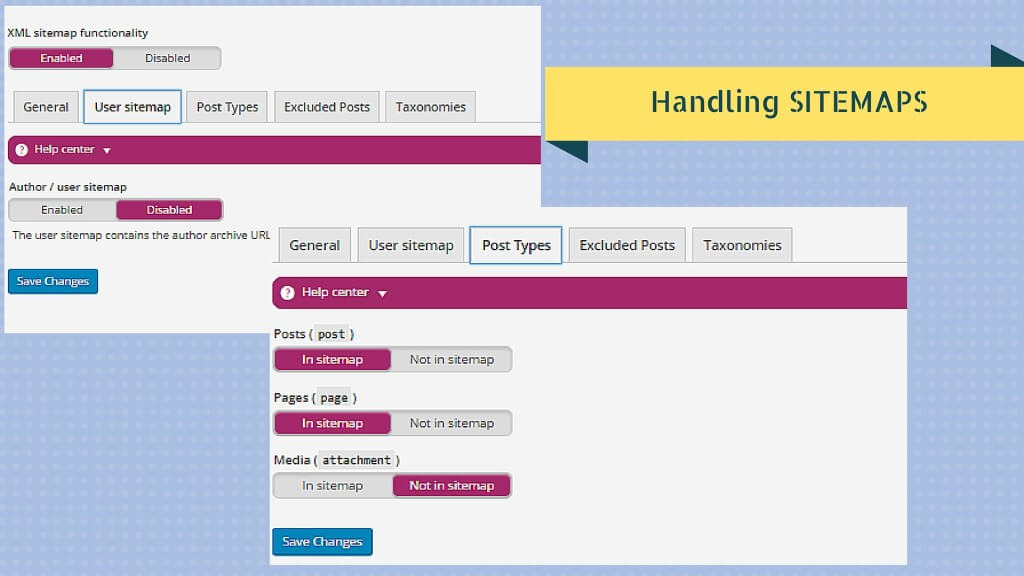
A Sitemap is the XML file which consists of the hierarchical structure of all the pages and posts of your blog. It is a very important feature for google indexing your web pages. The biggest advantage of handling sitemaps from Yoast is that it updates the sitemap after every new update on the website. So you don’t need to generate it again and again from the google webmaster tool.
You can choose to include the posts and the pages in the sitemap according to your will.
BONUS:
Watch this video tutorial to set up the Yoast SEO plugin on your WordPress account.
So this was all about configuring the Yoast SEO plugin. If you have any doubts regarding the SEO of your website, you may comment below in the comment box. I’ll be happy to help you out.
Also, share this post with your friends and colleagues who are struggling with their website SEO. A little help from your side will save their time and money.
Also read: Best cameras for YouTube videos


3 comments
Thanks for the follow up. Yoast is the best WordPress plugin for optimizing your website better in search engines. I too use the plugin for my websites.
Hi Marty
Good to hear from your side.
Sure, Yoast is the best plugin to do OnPage SEO for your website. It reduces a major task in handling sitemaps, social media fan pages and much more.
Stay tuned for more updates.
Your post is very interesting. Thank you for the detailed information about WordPress plugins and how to handle them.